Hey DevOps enthusiasts! Today is all about ECS – Elastic Container Service, a term that might be new to some of you. So, let's unravel the world of ECS as part of our fantastic 90 Days of DevOps Challenge. Ready to dive in? Let's go! 😉
What is ECS? 🤔
ECS, or Elastic Container Service, is AWS's fully-managed container orchestration service. In simpler terms, it's the magic that allows you to run and manage Docker containers on a cluster of virtual machines (EC2 instances) without worrying about the underlying infrastructure. With ECS, deploying, managing, and scaling your containerized applications becomes a breeze, whether you prefer Fargate or EC2 launch types.
Key Features of ECS:
Flexibility: Supports Fargate and EC2 launch types.
Integration: Works seamlessly with Elastic Load Balancing, Auto Scaling, and Amazon VPC.
Compatibility: Supports Docker Compose and Kubernetes for easy adoption of existing workflows.
Difference Between EKS and ECS? 🔄
Before we dive into ECS setup, let's quickly understand how EKS (Elastic Kubernetes Service) differs from ECS.
Architecture: ECS uses a centralized architecture, while EKS has a distributed architecture based on Kubernetes control planes.
Kubernetes Support: EKS is fully managed and supports Kubernetes natively, while ECS has its own orchestration engine.
Scaling: EKS auto-scales your Kubernetes cluster, while ECS requires manual configuration of scaling policies.
Flexibility: EKS provides more customization options, while ECS offers a simpler, more managed platform.
Community: EKS benefits from a large Kubernetes community, while ECS is driven by AWS with a smaller community.
In summary, EKS is ideal for Kubernetes enthusiasts, while ECS offers a managed and straightforward platform for containerized applications.
Task: Setting up Nginx on ECS 🛠️
Ready for some hands-on learning? Let's set up Nginx on ECS step by step!
Step 1: Navigate to AWS ECR Console 🌐
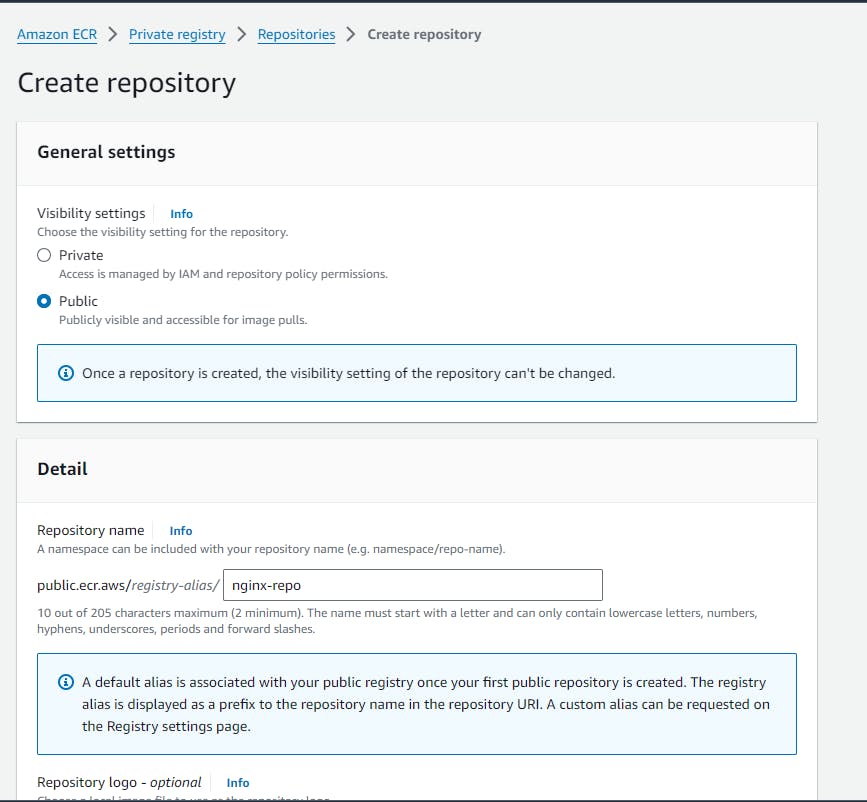
Go to AWS Console and search for ECR service and select create a repository.

Step 2: Select private or public(here selecting public). This way anyone will be able to access the repository and Give a name to the repo and submit create repo button

Step 3: We could access newly created ECR in dashboard now.

Step 4: connect to EC2 instance and from CLI will connect to ECR and push niginx image in repository.
Make sure you have already installed AWS CLI and Docker on ec2 system.

Once connected , go to ECR repository and view for push code and paste first commands in terminal:


Step 5: Lets Pull NGINX image from docker-hub.

before pushing local nginx image to ECR will rename image with below syntax:
docker tag <local-image> <ECR>/<new-image-Name>:<tag>

Now pushed an image to ECR.

Step 5: Copy public URL from repository to run docker image

We could see our container is running and we can verify deployment using public-ip:80

Voila! You've successfully set up Nginx on ECS. Feel free to explore, experiment, and share your experiences!
Ready for more DevOps adventures? Stay tuned for Day 32! 🚀💻 #AWS #ECS #DevOps #Containerization #TechLearning #AWSCommunity
Thank you for reading this Blog. Hope you learned something new today! If you found this blog helpful, please like, share, and follow me for more blog posts like this in the future.
You can connect with me at: https://www.linkedin.com/in/davendersingh/